Please update your browser. It looks like you are using an old version of the Microsoft Edge browser. To get the best experience with the Pfeiffer website, please update your browser.

Contact Customer portal
Global
  • EN
  • DE
  • ZH
  • KO

5.1 Fundamentals of total pressure measurement

Pressure is defined as force per unit of area: p=F/A (Formula 1-3) where F is the force and A the area to which the force is applied. The SI unit of pressure is 1 N / m² = 1 Pa. Other frequently-used units of pressure are: 1 mbar = 1 hPa = 100 Pa and 1 Torr = 133.322 Pa. If pressure is measured via the force that is exerted on an area, the pressure measurement is independent of the type of gas.

Pressure measurement on the basis of force reaches its limits at pressures of less than 1 hPa, because the exerted forces become too small. Consequently other processes must be used. The thermal conductivity of the enclosed gas can be used, for example, or the gas molecules can be ionized and the ion current flowing between electrodes measured. These indirect measurements which determine the pressure from a gas property consequently deliver a measurement result that is dependent on the type of gas.

In vacuum technology, no single measurement method covers the entire pressure range. It is therefore necessary to use different sensors. The criteria for selecting a pressure sensor are based upon various conditions:

  • The pressure range to be detected
  • Gas composition: Inert or corrosive
  • Required accuracy and repeatability
  • Environmental conditions, such as radioactivity
5.1.1 Direct, gas-independent pressure measurement

In the case of a diaphragm vacuum gauge, pressure is measured in accordance with the definition. A pressure p is exerted on a diaphragm having a defined area A and deflects the diaphragm proportionally to the pressure. A sensor measures the deflection; in the most straightforward case, the deflection is transmitted mechanically to the needle moving over a pressure dial. Piezo-resistive or capacitive sensors receive the pressure signal and convert it into an electrical signal.

Piezo-diaphragm vacuum gauges

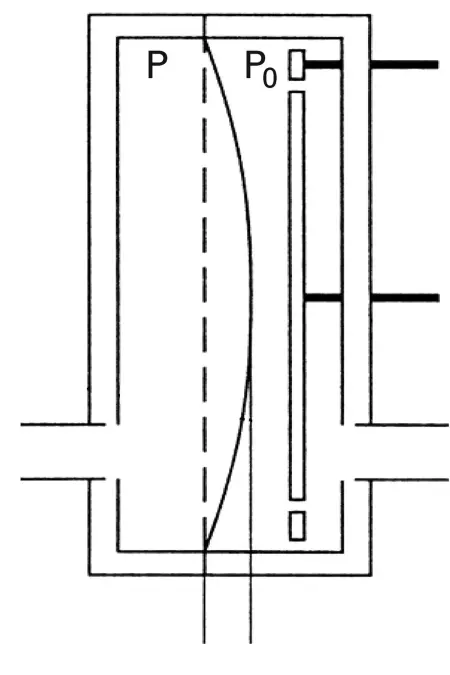
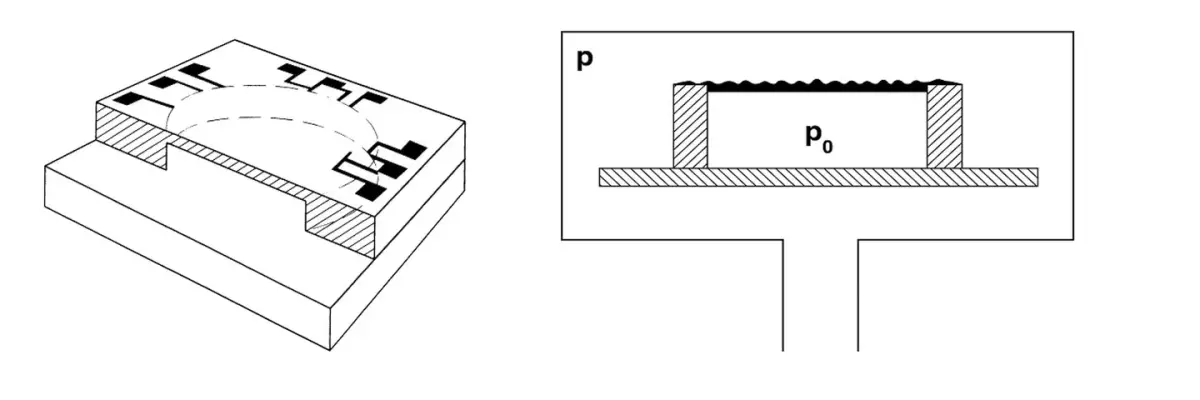
A simple and extremely robust method involves the use of a piezo-resistive pick-up. The design is shown in Figure 5.1. A diaphragm into which strain resistances have been diffused is arranged over an evacuated volume having a reference pressure p0. The measured change in resistance as a result of diaphragm deflection serves as a parameter for the pressure. This sensor is characterized by its insensitivity to gas inrush and its high accuracy.

Capacitive diaphragm vacuum gauges

In a capacitive vacuum gauge (Figure 5.2), deflection of the diaphragm is measured as the change in capacity of a plate capacitor that is formed by the diaphragm and a fixed counter-electrode in a well-evacuated space having a pressure p0. The diaphragm is comprised either of ceramics with a vacuum-metalized coating or of stainless steel. This method and diaphragms of varying sensitivity can be used to perform measurements of four decades each. The lower measurement limit is 10-5 hPa.

The limiting effects are:

  • Change in clearance between the capacitor plates due to the influence of temperature
  • Decreasing forces acting on the diaphragm at low pressures


The influence of temperature can be minimized through electronic compensation of a known temperature drift or by means of an integrated heater that maintains the sensor at a constant temperature. The influence of temperature can be further reduced through the use of ceramic diaphragm material; in addition ceramic diaphragms give capacitive vacuum gauges excellent resistance to corrosive gases.

Spinning rotor gauge

A spinning rotor gauge (SRG), a so-called gas friction gauge, is used for calibration purposes. A sphere is magnetically suspended in the vacuum and caused to rotate rapidly, at which point the drive is then de-energized. The pressure of the type of gas that is present can be calculated from the decrease in rotational frequency due to gas friction. In the molecular flow range, these devices measure up to pressures p > 10 -7 hPa. The calibration of the device is dependent only on the sphere, which means that calibrated spheres can be used as a transfer standard. These vacuum gauges are not as suitable for vacuum processes since the time taken for the measuring process increases as the pressure decreases.

5.1.2 Indirect, gas-dependent pressure measurement

As the pressure decreases, an increasing amount of instrumentation is required to measure the reduced forces acting on the diaphragm. Other measuring principles which supply pressure information indirectly through measuring a gas property make it relatively easy to design vacuum gauges for the medium vacuum range. Vacuum gauges that work by defining the pressure are not realizable for high vacuum and ultra-high vacuum as the forces acting on the membrane are insufficient.

When considering indirect pressure measurement under vacuum it is a good idea to take the particle-number density as a starting point. According to the status equation that applies for an ideal gas: p=nkT (Formula 1-8) this is proportional to the pressure at a constant temperature. The two phenomena used in vacuum technology for measuring pressure are the conduction of heat and electricity through the gas contained in the measuring area of the pressure gauge. Each gas particle has a share in the conductance and it is therefore easy to imagine that the density, and as a result, the pressure have a certain degree of influence on the conduction. Since gas atoms or molecules have different properties and in particular masses, pressure measurement based on this conductance phenomenon delivers readings that are dependent upon the type of gas.

Pirani (thermal transfer) vacuum gauges

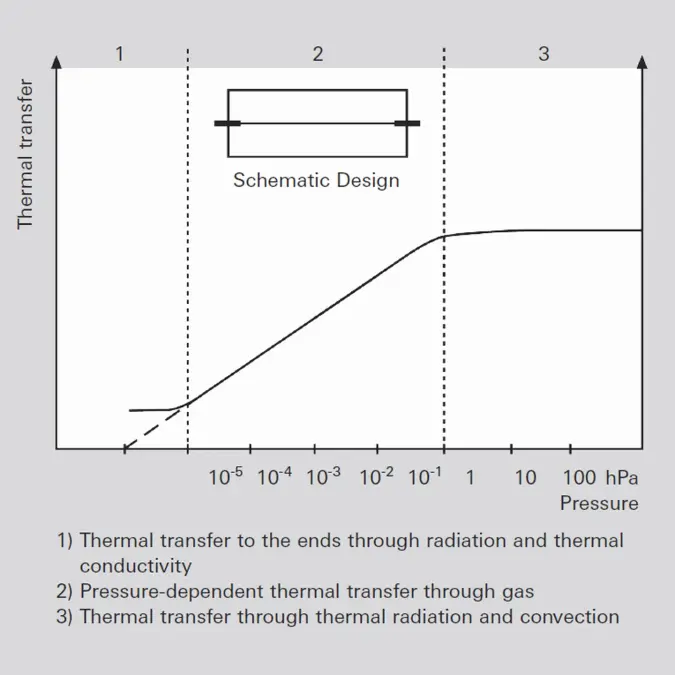
A Pirani vacuum gauge utilizes the thermal conductivity of gases at pressures p of less than approx. 10 to 100 hPa. Wire (usually tungsten) that is tensioned concentrically within a tube is electrically heated to a constant temperature between 110°C and 130°C by passing a current through the wire. The surrounding gas dissipates the heat to the wall of the tube. In the molecular flow range, the thermal transfer is proportional to the molecular number density and thus to the pressure. If the temperature of the wire is kept constant, its heat output will be a function of pressure. However it will not be a linear function of pressure, as thermal conductivity via the suspension of the wire and thermal radiation will also influence the heat output.

The limiting effects are:

  • Thermal conductivity will not be a function of pressure in the (laminar flow range) range of approx. 10 hPa to atmospheric pressure (the limit depends on the type of gas).
  • The thermal conductivity of the gas will be low relative to the thermal transfer over the wire ends at pressures below 10-4 hPa, and will thus no longer influence the heat output of the wire. Consequently, the measurement limit is approximately at 10-4 hPa.
  • Thermal radiation will also transfer a portion of the heat output to the wall of the tube.
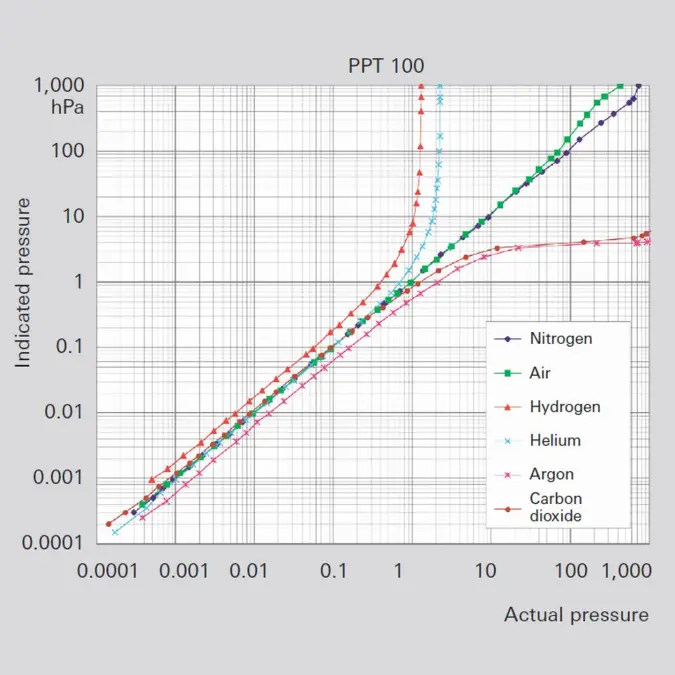
Figure 5.4 shows the different curves for various gases between 10-4 hPa and atmospheric pressure. While good linearity can still be seen for nitrogen and air, significant deviations are indicated for light (He) and heavy gases (Ar). For Pirani vacuum gauges, correction factors are given in the operating manuals for converting the nitrogen equivalent pressure that is indicated into the correct pressure for the gas measured. These factors can be entered in the control and display devices which will then automatically indicate the correct converted pressure. This correction only applies for the linear portion of the characteristic curve shown in Figure 5.4.

Cold cathode ionization vacuum gauges

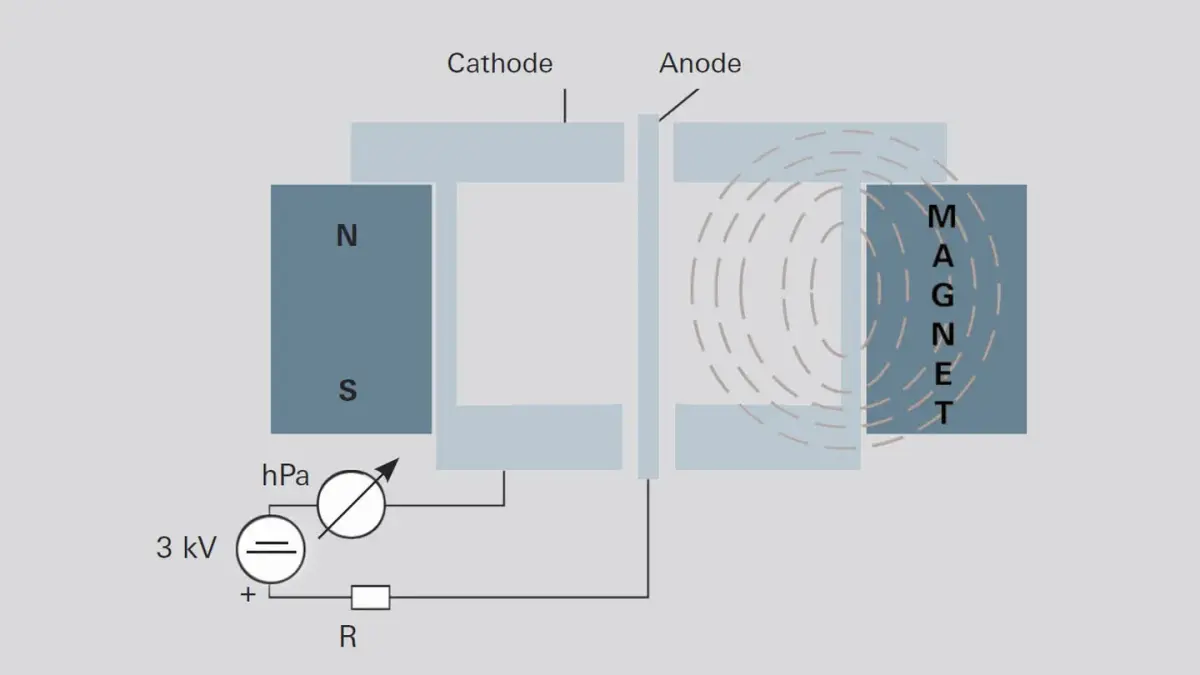
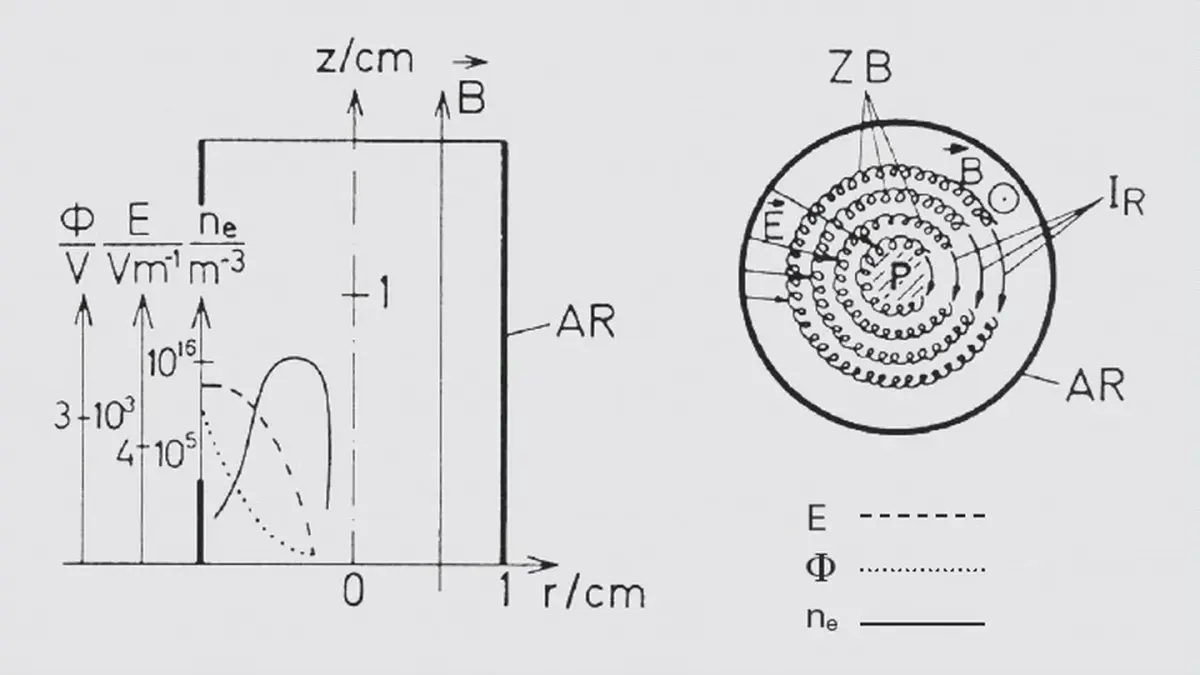
Cold cathode ionization vacuum gauges essentially consist of only two electrodes, a cathode and an anode, between which a high voltage is applied via a series resistor. Negatively charged electrons leave the cathode through field emission, moving at high velocity from the cathode toward the anode. As they travel this path, they ionize neutral gas molecules, which ignites a gas discharge. The measured gas discharge current (Figure 5.5) is a parameter for pressure. However only few molecules are ionized in the case of straight electron trajectories, which results in lower sensitivity and interruption of the gas discharge at approximately 1 hPa. A design that avoids this disadvantage is the Hobson and Redhead inverted magnetron [28]. A metal pin (anode) is surrounded by a rotationally symmetrical measurement chamber (cathode) (Figure 5.5). An axially magnetized cylindrical, permanent-magnet ring is placed on the exterior of the measurement chamber to generate a magnetic field within the chamber.
The electrons travel through the magnetic field on spiral trajectories (Figure 5.6). The electron paths extended in this manner increase the probability of collisions with the gas molecules and ensure that sufficient ions are generated to maintain the gas discharge, even at pressures of less than 1 hPa. The pressure reading will depend upon the type of gas in question due to the different ionization probabilities of the various gases. For example, a lower pressure will be indicated for helium than for air.
Cold cathode vacuum gauges can be easily contaminated under the following conditions:

  • If the device is activated at pressures pp of more than 0.1 hPa.
  • If the gauge is regularly used in an argon atmosphere in the medium vacuum range. Argon is often used for applications in sputtering systems. This results in sputtering of the cathode due to bombardment with ions, as well, which can cause short circuits and failures of the gauge as a result.
  • If operated in residual gas atmospheres containing hydrocarbons.


Gases are also gettered on the surfaces of the cathode. This produces a pumping effect that will falsify the measurement signal.

When installing the gauge in a vacuum system, it is necessary to take the magnetic field into consideration, as it can interfere with sensitive equipment, particularly if they use electron or ion optics.

Hot cathode ionization vacuum gauges

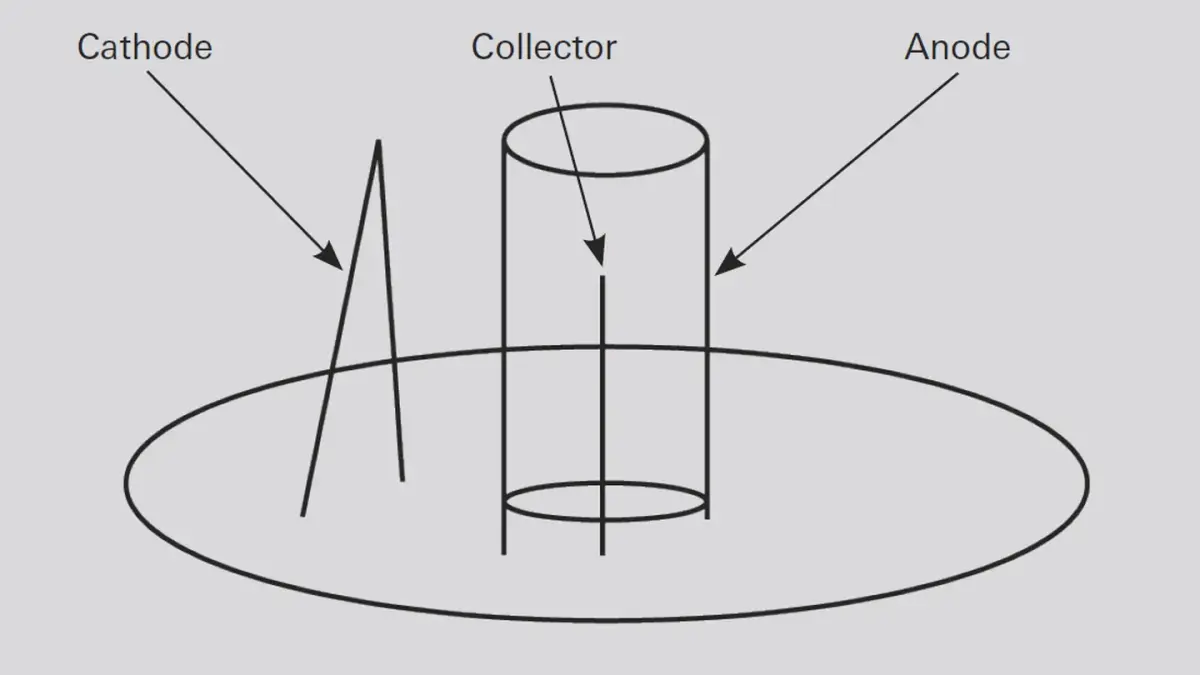
In this case electrons are generated with the aid of a heated cathode. Figure 5.7 shows the design of a gauge after Bayard–Alpert [27]. A thin wire is arranged in the middle of the cylindrical, lattice-shaped anode; this wire serves as the ion collector. A voltage of approximately 100 V is applied between anode and cathode. This accelerates all emitted electrons toward the anode. The emission current is measured in the anode circuit, which can be set by means of the heat output of the cathode. On their way to the anode electrons collide with gas molecules. The ions travel to the collector being at the same potential as the anode.

The measured collector current is a parameter for pressure. Since the emission current is proportional to the ion current, it can be used to set the sensitivity of the gauge.
Pressures can be accurately measured to 1 · 10-10 hPa with Bayard-Alpert vacuum gauges. Measuring errors result from the pumping effect of the sensor, as well as from the following two limiting effects:

  • X-ray bremsstrahlung: Electrons that strike the anode cage cause x-rays to be emitted, some of which strike the collector. This x-ray effect causes the collector to emit photo electrons that flow off toward the anode. The resulting photoelectron current increases and falsifies the pressure-dependent collector current. Consequently the collector wire should be selected as thin as possible so that it collects only very little x-ray radiation. The lower measurement limit is therefore also known as the x-ray limit.
  • ESD ions: ESD (electron stimulated desorption) means that gas molecules deposited on the anode cage are desorbed and ionized by electrons. These ions also increase the pressure-proportional ion current.


A hot cathode vacuum gauge also gives a gas type dependent pressure signal. However the measurement results are significantly more accurate (typically ±10 %) than those obtained with a cold cathode ionization vacuum gauge (typically ± 25 %). Bayard-Alpert vacuum gauges are therefore often used as a reference for calibration.